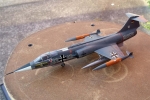
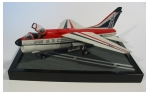
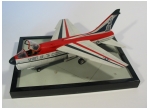
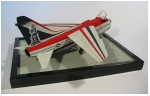
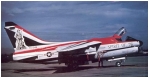
Another in my collection of A-7's, this one was a far cry from any other A-7 paint scheme.
The Ling-Temco-Vought A-7 Corsair II is a carrier-based subsonic light attack aircraft introduced to replace the United States Navy's A-4 Skyhawk, initially entering service during the Vietnam War. The Corsair was adopted by the United States Air Force, as well as the Air National Guard, to replace the A-1 Skyraider, F-100 Super Sabre and F-105 Thunderchief.
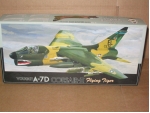
Fujimi have released a very nice range on the A-7 Corsair II from the A,B,D and E. The kit features nicely done recessed panel details and, like most fujimi kits, a very nice fit.
The kit includes some decent weapons with the following available:
The decals included allow for four Air National Guard versions of the A-7D:-
Special thanks to George Thorpe who has let me know of an error in the instructions. The Flying Tigers decal should represent England AFB, 23TFW, 74TH TFS "Flying Tigers". Not a Louisiana ANG Bird.
One advantage the Fujimi kit has over the Italeri one is the intake. This one features a reasonably long intake but does often require a bit of filling and sanding, which can be a real pain when the intake has been put together.
Another advantage over the Italeri kit is the cockpit detail, which has some nice panels and switches in the cockpit where as the Italeri kit has decals.
Like the Italeri kit it also features an inaccurate cockpit bulkhead. If you want to display the cockpit open then you're going to need to cut out the solid section behind the seat and scratch build a correct version of the rear cockpit.
Construction begins in the cockpit. I cut the rear bulkhead horizontally and used it to build the base of the rear of the cockpit. I built this kit the same time as the Italeri A-7D kit so I had a little construction line going to do all these steps to both kits at the same time. I try not to do this anymore as it tends to make you want to rush one, or you make a mistake and start to have a favourite which gets most of the attention.
Once the correct cockpit has been constructed it was painted barley grey and installed into the fuselage. The jet intake can be installed after the fuselage halfs have been joined which makes it easier to focus on getting the fuselage fit correct without worrying about making any mistakes in that big gaping maw of an intake.
The intake, wheel wells and landing gear parts were sprayed white then the landing gear and wheel wells were given a coat of future to protect them from the wash.
Once the intake was built, the only thing left was to attach the wings and tail planes, which went on perfectly with no problems at all.
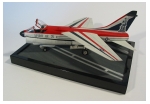
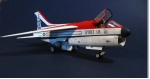
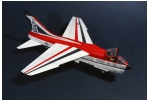
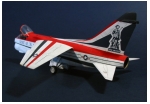
This was something quite different and a welcome relief from the many camo jobs that preceded it.
The "Spirit of 76" required all over white with red and insignia blue striping. Because the large tail graphic was a decal I needed to create the blue manually to ensure it would match the decal.
This was a pretty clean bird so I didn't bother with any pre-shading so after a few coats of white I went right into masking the blue. The fuselage strips are quite thing so I needed to be really careful with applying the masking tape. Another potential pitfall of colour schemes of this nature is getting the wing stripes consistent on both wings. If one is even the slightest bit off angle, or is a different size then it will look awful.
With this in mind I really took my time masking this up and took a lot of care when removing the tape. Applying the masking down the leading edge of the vertical stab was the trickiest part, this section was very small and there wasn't a lot of room to stick the tape to.
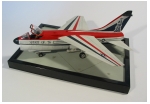
The decals were from Microscale's 72:0173 sheet which includes 3 A-7's. The decals are very nice indeed and went on with only a touch of Micro Set and Sol to soften them into the panel lines.
I didn't bother with any stencil data, as it appeared that this particular aircraft didn't have any? (Or did I just forget?)

Both this and the 72nd Italeri A-7D were finished at the same time. This includes the standard coat of future and dark washes to bring out the panel lines. I also weather both aircraft at the same time, which caused a few problems with this one as I went a little overboard with the 'dirtiness' of the overall finish. I don't this this paint scheme should be quite so well used looking, but that's another lesson learned.
After the weathering I applied a matt coat to dull everything down, perhaps a little too dull for this one but I'm still very pleased with how it came out and it's great to have a A-7 which stands out from the bunch.
Check out our new Online Scale conversion tool. Convert from any scale in any unit of measurement to any other scale in any other unit.